Puppet Blogger Template

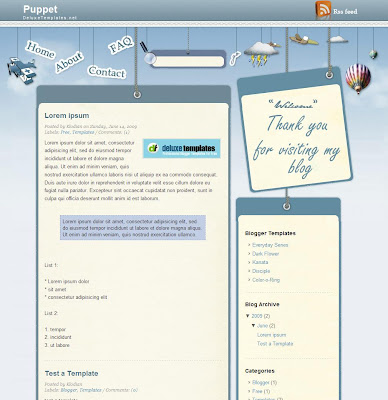
The puppet blogger theme is a simple two column template that has a fancy navbar that finds itself mixed with the header image. Just above the header section there is a strip that holds the title and the description. The right of it is the subscribe to feed RSS icon.
The search bar finds itself amidst the navigation size, the icons seem to be hanging with strings, this is perhaps why the theme gets the puppet title. The first section of the sidebar is tilted to one side and has a welcome message for your blog visitors.
There are minor flaws in the design, like the little glitch between the rounded parts and the sections. The template ends with a footer design of a city landscape, if you like ahead it go ahead and download it!
Download the Puppet Blogger Template
Daily Planet A & B Blogger Skins

There are a few differences between the two templates lets take a look at these first. The Daily Planet A is a direct conversion from the wordpress theme. This means it comes complete with mini posts on the home page with auto read more. While B is a simpler version that does not have the read more and has full posts on the home page.
Apart from this both these templates come complete with all the features of a premium template. It starts off with a header that you can easily change, under that is a navigation menu. Then the featured post section, the stories from this spot are also displayed in the sidebar.
Under the posts section is a tabbed widget that allows you to showcase quite a bit of content. This section ends with a division of the main column into three sections. While the sidebar also has a tab section under the search bar which is placed after the featured posts.

The sidebar then splits up into two columns, making this an extremely functional magazine style design for your blogspot blog.
Installation Instructions: (Taken from Cahaya)
MENU
This is HTML Structure of menu
<li><a href='YOUR-MENU-LINK-LOCATION' title='View Files Under MENU-TITLE'>MENU-TITLE</a></li>Change the word:
- YOUR-MENU-LINK-LOCATION with your menu link.
- MENU-TITLE with your menu title. Example: About, Contact, or etc.
If you want to add more menu link. just copy-paste the structure above under the previous.
POSTLINK
This is the HTML Structure Of POST LINK in Daily planet.
Change the word :
<div class="panel">
<img width="100" alt="" src="YOUR-IMAGE-HERE" height="60"/>
<div class="fcats"><a href="YOUR-POST-CATEGORY-LINK-LOCATION" rel="category" title="LABEL-TITLE">LABEL-TITLE</a> </div>
<h2><a href="YOUR-POST-LINK-LOCATION" title="POST-TITLE">POST-TITLE</a></h2>
<div class="auth"> Posted by AUTHOR</div>
<div class="fmeta">
MM-DD-YYYY |
<a href="YOUR-POST-LINK-LOCATION#comments" title="Comments On POST-TITLE">ADD COMMENTS</a></div>
</div>
- YOUR-POST-CATEGORY-LINK-LOCATION with your CATEGORY LINK LOCATION. Example: http://www.cahayabiru.com/search/label/Blogger%20Tricks
- YOUR-POST-LINK-LOCATION with your post link location.
- POST-TITLE with your post title.
- YOUR-IMAGE-HERE with your image. The size is 100px width and 60px height.
- AUTHOR with your name.
Here is The example code that you can use.
<div class="panel">FEATURED HEADLINES
<img width="100" alt="" src="http://web2feel.com/dailyplanet/wp-content/uploads/bats.jpg" height="60"/>
<div class="fcats"><a href="#" rel="category" title="View all posts in Featured">Featured</a> </div>
<h2><a href="#" title="Batman is back">Batman is back</a></h2>
<div class="auth"> Posted by jinsona </div>
<div class="fmeta">
Nov-20-2007 |
<a href="#" title="Comment on Batman is back">ADD COMMENTS</a></div>
</div>
<div class="panel">
<img width="100" alt="" src="http://web2feel.com/dailyplanet/wp-content/uploads/music.jpg" height="60"/>
<div class="fcats"><a href="#" rel="category" title="View all posts in Featured">Featured</a>, <a href="#" rel="category" title="View all posts in Uncategory">Uncategory</a> </div>
<h2><a href="#" title="Post with links">Post with links</a></h2>
<div class="auth"> Posted by jinsona </div>
<div class="fmeta">
Nov-18-2007 |
<a href="#" title="Comment on Post with links">ADD COMMENTS</a></div>
</div>
<div class="panel">
<img width="100" alt="" src="http://web2feel.com/dailyplanet/wp-content/uploads/pitts.jpg" height="60"/>
<div class="fcats"><a href="#" rel="category" title="View all posts in Featured">Featured</a> </div>
<h2><a href="#" title="An ordered list">An ordered list</a></h2>
<div class="auth"> Posted by jinsona </div>
<div class="fmeta">
Nov-18-2007 |
<a href="#" title="Comment on An ordered list">ADD COMMENTS</a></div>
</div>
Here is the HTML Structure of Daily Planet Featured Content
<h2><a href="YOUR-POST-LINK-LOCATION" title="POST-TITLE">POST-TITLE</a></h2>
<div class="fentry">
<p> <a href="IMAGE-LINK-LOCATION"><img alt="" width="240" src="IMAGE-LINK-LOCATION" class="alignnone size-full wp-image-28" height="150" /></a>
YOUR TEASER TEXT
.</p>
<div class="clear"></div>
</div>
<div class="featmeta">
<span class="cats"> Posted under <a href=" YOUR-CATEGORY-LINK-LOCATION" rel="category" title="CATEGORY-TITLE">CATEGORY-TITLE</a> </span>
<span class="rm"><a href="YOUR-POST-LINK-LOCATION" title="Batman is back">Read More</a> </span>
</div>
Please, change the words:
Here is the example that you can try in your daily planet template.
<h2><a href="http://travellogsbook.blogspot.com/2009/03/hidden-overlapping-image-and-text-list.html" title="Batman is back">Batman is back</a></h2>
orem ipsum dolor sit amet, consectetuer adipiscing elit. Quisque sed felis. Aliquam sit amet felis. Mauris semper, velit semper laoreet dictum, quam diam dictum urna, nec placerat elit nisl in quam. Etiam augue pede, molestie eget, rhoncus at, convallis ut, eros. Aliquam pharetra. Nulla in tellus eget odio sagittis blandit. Maecenas at nisl. Nullam lorem mi, eleifend a, fringilla vel, semper at, ligula. Mauris eu wisi. Ut ante dui, aliquet nec, congue non, accumsan sit amet, lectus. Mauris et mauris. Duis sed massa id mauris pretium venenatis. Suspendisse cursus velit vel ligula. Mauris elit. Donec neque. Phasellus nec sapien quis pede facilisis suscipit. Aenean quis risus sit amet eros volutpat ullamcorper. Ut a mi. Etiam nulla. Mauris interdum.
<div class="fentry">
<p>L<a href="http://web2feel.com/dailyplanet/wp-content/uploads/batmans.jpg"><img alt="" width="240" src="http://web2feel.com/dailyplanet/wp-content/uploads/batmans.jpg" class="alignnone size-full wp-image-28" height="150" title="batmans"/></a>
Lorem ipsum dolor sit amet, consectetuer adipiscing elit. Quisque sed felis. Aliquam sit amet felis. Mauris semper, velit semper laoreet dictum, quam diam dictum urna, nec placerat elit nisl in quam. Etiam augue pede, molestie eget, rhoncus at, convallis ut, eros. Aliquam pharetra. Nulla in tellus eget odio sagittis blandit. Maecenas at nisl. Nullam lorem mi, eleifend a, fringilla vel, semper at, ligula. Mauris eu wisi. Ut ante dui, aliquet nec, congue non, accumsan sit amet, lectus. Mauris et mauris. Duis sed massa id mauris pretium venenatis. Suspendisse cursus velit vel ligula. Mauris elit. Donec neque. Phasellus nec sapien quis pede facilisis suscipit. Aenean quis risus sit amet eros volutpat ullamcorper. Ut a mi. Etiam nulla. Mauris interdum.
<div class="clear"></div>
</div>
<div class="featmeta">
<span class="cats"> Posted under <a href="#" rel="category" title="View all posts in Featured">Featured</a> </span>
<span class="rm"><a href="#" title="Batman is back">Read More</a> </span>
</div>
Download the Daily Planet A Blogger Skin
Download the Daily Planet B Blogger Skin
Dreamy Blogger Template

Well this template has very pleasant colours, pastel shades and mini posts on the homepage. Well it automatically picks up the first image makes it a thumbnail and displays it on your home page.
The template starts off with the blog title and description on the left, a couple of links on the right along with a search bar. The main container starts with a rounded navigation menu, then you have the mini posts with the headline, labels and comment number.
There is a sidebar on the right that has a simplistic design, over all this template has a good design and does well for a two column template!
Download the Dreamy Blogger Template
Green Leaves Blogger Theme

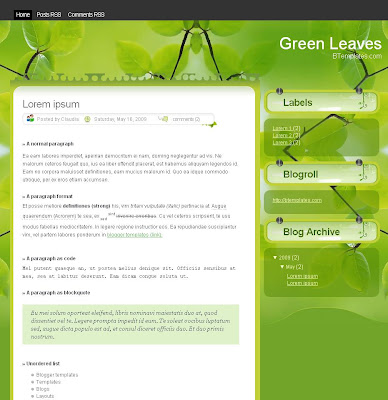
The template starts off with a narrow navigation bar on a black background, that's where you place your Home, RSS, Contact links etc. The blog title and description appears on the right below the menu bar. Then the main column, which is on a white background, has the author name, time stamp and comments in a rectangular box below the headline. While the labels appear at the end of each post.
Ray Creations templates always come with rounded columns, that somehow look better then the square edges. The single sidebar is divided into boxes, so each section comes in neatly designed light green box, followed by its content in transparent boxes. There are no additional features in this template or a search box.
Download the Green Leaves Blogger Theme
Photografia, the Photo Blogger Template

This 2 column template is different then the conventional photo blog designs. It has lot more features that allows you to display your best photographs, write about it and even create your portfolio page. The home page has a mirrored menu bar consisting five boxes, which are fixed since its part of the background. Even if you don't have links to put in the five boxes, it will stay. For instance you can add page links like 'Home', 'About', 'Contact', 'Subscribe' and 'Portfolio' from Layout-Page Elements.
Below that is the slide show to exhibit your photos, you can upload images on photo-sharing sites, preferably 750x500, and click on Edit Html to place the image url. Search for this code -
<b:if cond='data:blog.url == data:blog.homepageUrl'>The single column on the left side is customisable to suit your requirements, you can add any of the blogger gadgets available. Since the home page has a fixed height it would be better to put one or two widgets in the sidebar, because the more you add it tends to look untidy.
<div id='s3slider'>
<ul id='s3sliderContent'>
<li class='s3sliderImage'>
<img src=' put url of the image here'/>
<span> text-to-be-displayed </ span>
</ li>
You can also display thumbnail images which expand when clicked, so the reader clicks on a thumbnail and gets to see the larger version of the image without having to leave the current page. For this you can activate the lightbox feature, by placing the following code in your internal page.
<a href=" url of image "rel="lightbox"> <img border="0" src=" url of image" style="height: 110px; width: 110px;" /> </ a>
 You can create a 'Portfolio' page and add the above code to display thumbnail images. The images appear on black background that goes perfectly well with any picture. Photografia Blogger Template would definitely be our choice when we start our photo blog.
Download Photografia, the Photo Blogger Template
Blue Glide Blogger Skin

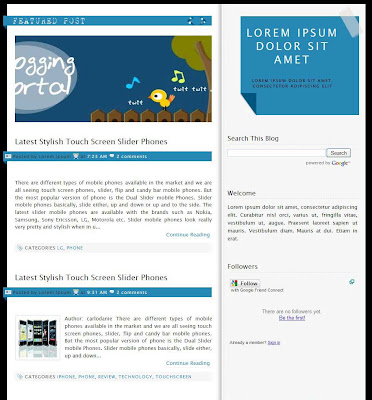
Blue Glide template doesn't include a conventional header, instead the blog title and description appears in the right sidebar in a designed box. Adjacent to that is the image slider for your featured posts, image size should preferably be 620x220 pixel. You can also have a display of your photographs with the post title and description.
To add images go to Page Elements---Click edit on Glider Content widget---Copy/Paste the code below -
<div class="glidecontent">If you are adding five images, copy the same code five times and add the image url, post link, title and summary. The posts starts below the slider and the author name, timestamp and comments are placed in a blue rectangular box. The template also has the Read More feature enabled, followed by labels.
<div class="glidemeta">
<h2><a href="http://YOUR-DESTINATION-LINK-HERE" title="HOVER-TITLE">TITLE-TEXT</a></h2>
your summary/description here ...</div>
<a href="http://YOUR-DESTINATION-LINK-HERE"> <img width="620" src="https://blogger.googleusercontent.com/img/b/R29vZ2xl/AVvXsEi06UIB_YISFJw0X6pNc3Fb3jgP4RVURZs2hxmTFKSZHBqvbFhewvZbUGSOYY7wYr7WrWUtNS-pFtTL-fKAO0zeOXH9ftCwtK0GJv3m7IEewvbucdTtc0fjcEGdcITZmAQBNDXF-w2_eRs/s1600/joecat.jpg" height="220"/> </a>
</div>
In this template the search box is integrated in the side column, after which you can add few blogger widgets. Then the column splits into two where you can place the rest of your content like labels, blog list, archives etc.
The white and grey background with strips of blue gives it a neat look. Blue Glide template can be used for a personal or photography blog.
Download the Blue Glide Blogger Theme
Isabela Blogger Theme

Template Isabela is a 3 column template that includes an artistic header to add your blog title, and below that is the menu bar. The main column in this template appears in the middle and the two columns are on either sides.
The main column starts with a date stamp, then a rounded designed box for the headline, and the rest of the details like author, labels and comments come at the bottom of the post. You can add plenty of blogger widgets in the two sidebars, the right column also has search box integrated at the top.
If you need more space, then the footer comes with 3 columns to add your favorite interactive widget. Template Isabela can be used for an art and design blog.
Download the Isabela Blogger Theme
BCute Blogger Template

Its not very often that you come across a two column template that looks good and has functional features, this is exactly what the BCute template has to offer. It starts off with an artistic header with the title and description on the left. The top right has the RSS feed icon and below that is a menu bar to navigate through your blog.
The header also has a big twitter display, where your visitors can see your last tweet, the right hand side of this section features a search bar.
The rest of the template is simple, the post section on the left and the sidebar on the right. The author, date, labels and comments are displayed just under the headline and there is a thin line to separate one post from the next. There's a little arrow icon on the right hand side links of the sidebar.
If you like the BCute template you can have it!
Download the BCute Blogger Template
Smoky Blogger Theme

The 2 column theme has an interesting layout. The header is narrow so there is just about enough space to fit your blog title, and at bottom right of it is the search box. Now comes the interesting part, Smoky template has a featured posts in the form of a numbered slider. So on clicking the number, the corresponding slide or featured post shows up, where you can add post headline, few lines of the post and an image. Each slider also comes with the 'read more' link at the bottom.
To add content for featured posts, go to Edit HTML, search for the code below and change the links.
<div id='board_body'>Adjacent to that is the twitter icon to link your twitter profile. Then comes the navigation bar to browse through the sections on your blog, this bar also has a dropdown menu to add sub-categories.
<h2>Featured Posts</h2>
<div id='board_carusel'>
<div class='belt'>
<div class='board_item'>
<!-- board_item -->
<p><img alt='IMG ALT' src='IMAGE URL'/><strong><a href='YOUR POST URL'></a></strong> YOUR POST SUMMARY...</p>
<p class='more'><a href='YOUR POST URL'>Readmore</a></p>
<!-- /board_item -->
The main column has the regular layout. The post headline and below that is the labels, time stamp and a speak out icon. Each post has the Read more feature integrated that gives a neat look to the blog. The sidebar has got the subscribe option on top and then ad space to place sponsorship links etc. Then you can add any blogger widgets of your choice.
Download the Smoky Blogger Theme
Not Magazine Blogger Template

Not magazine, I am not sure why Cebong choose this name, gives ample space to display your content. Let's begin with the menu bar on top that also contains a search box. That's followed by the header, there is space to put your banner ad next to the blog title and description, and below it too there is a thin strip provided to embed a 728x15 adsense ad.
The home page consists of 4 columns, the left hand side column includes a RSS feed option, and you can also add one more blogger widget below it. While the main column might seem narrow on the home page, when you click on the post title the left sidebar disappears, making the post column broader.
Social bookmark icons appear at the end of every post and even the Read more feature is incorporated in this template. The right side columns can be used to display sponsorship ads, if any, or else a welcome note for the readers followed by the remaining content.
 Not Magazine template has additional 3 columns in the footer section, so it is more like magazine style template:) If you write on array of topics, then you can consider using Not Magazine template.
Download the Not Magazine Blogger Template
Premium Blogger Template

What can I say about this template its absolutely one of the best blogger templates that has so many features in it that you will require a bare minimum when it comes to customization or addition of tweaks.
Lets star off with the top you have a subscribe to email or feed situated at the top right had side of the blog header. The header is easily customized to your own blog title and feedburner email subscription with the following code.
<input name='url' type='hidden' value='http://feeds.feedburner.com/~e?ffid=YOUR-FEED-ID-HERE'/><input name='title' type='hidden' value='YOUR BLOG NAME HERE'/>
In the blogge version the Search and Categories are present but the Archives are not in the same box. Just under that is a box where you can have three 100 * 100 boxes mainly for advertisments. The recent posts display under that, all these features are included into the top half of the right sidebar which is a single coloumn.
The lower half of the sidebar then breaks up into two columns where you can add your widgets from bloggers content managment system. This template has an extremly professional look and can be used for a variety of blogs, it kind of looks techy for me but any serious blogger would like this template.
Download the Premium Blogger Template


